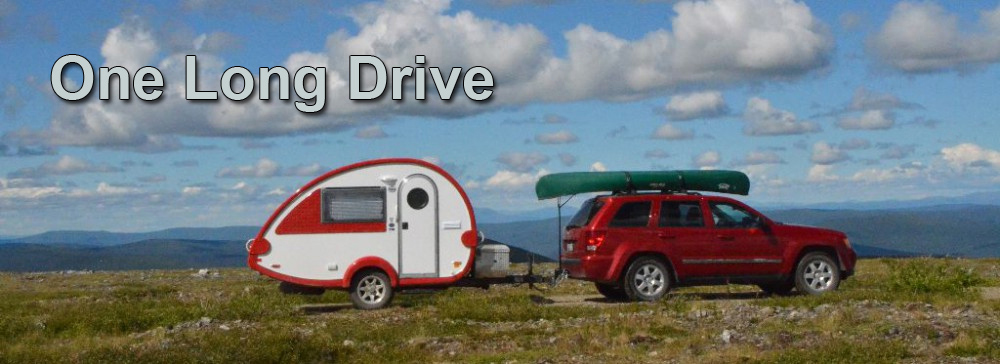
This page is for the folks who ask “How do you like that little trailer?” My impressions of it and the various systems, as well as the upgrades that I’ve done. The unique overall design, and the feel of the décor, made it feel special. The smallish size, rounded ceiling, round portals and rounded top of the door made me think of a hobbit hole. Warm and cozy, unique but not over the top. Funny that it matched the color of the Jeep so well that they look like a matched pair.
The trailer is a T@B M@X “Q” model, plus the front window and side portal window. They pronounce the @ as an A, so say Tab Max Q. Nice kitchen, big bed, no toilet to clean (other models have a toilet). I had the trailer raised a bit on the suspension, added skid plates, and the front shroud changed to a diamond plate truck box. This last so I can carry an extra battery for the 200 watts of solar panels on the roof to charge and a generator for dry camping in the winter or forest. I added a backup camera, sawed the business end off of a speed wrench for the stabilizers and chucked that up in a drill. I’m using a device that lifts one of the tires off the ground to level it side to side when that really matters to me.
The trailer is plenty cozy in the rain and wind. I am just short enough that without my shoes on I don’t hit my head standing up in the middle. It feels like a little apartment, not like camping. Good as a place to work on the computer or read a book. I didn’t cook as much as I might have, but when I did it was nice to have the control of gas. The sink is nice for doing dishes, but I’m still hopeful that I can get rid of the plastic taste in the water system. The refrigerator was mostly home to a supply of tasty water in refillable bottles, a few eggs, a little milk, bread, lunch meat and some condiments. The A/C was a gift when temperature and humidity were both high. Of course that really relies on shore power, so that means an RV park. When I did cook it was often a meal on the road, pulled over at some viewpoint along the way.
Given that I was traveling solo and not too tall, I was able to sleep sideways on the rear couch rather than rely on the table to complete the bed. With no table set up, the trailer feels quite roomy. The stock table is very sturdy as it forms the base for much of the bed when folded down. But the surface is as large as the space between the benches, so it really fills the room. When folded down it is about the size of a suitcase, but heavy and unwieldy. So even folded down it takes up a lot of space. When traveling it sits on the floor without any mount or strap or anything, so it would slide back and forth and vibrate or bounce around during travel on rough roads. So I left the stock table home and brought a smaller folding table that I could strap down. Folded flat it doesn’t take up much space. Now, that said, even it was probably more table than I needed. So I may be looking for a yet smaller table. For the times when I need the stock table I have mounted a Velcro strap on the front of the bench to keep it from roaming around too much. I’m guessing that if you plan to leave the unit configured with the bed laid out during travel that would keep the table in place just fine. I really wanted a solution where I could get in an lounge around at a moment’s notice. I didn’t do this often, but that was the plan as I was getting ready for the trip.
Being light as trailers go it was pretty easy to manage when unhooked. It has solid handles on each corner, and on level pavement and smoother hard ground I was able to adjust its position in a spot by hand. So this meant I could be less accurate aligning the hitch when hooking up, and one less time starting the car and moving it when unhooking. But in softer ground the nose wheel will dig in, probably a little more so with the couple hundred extra pounds on the tongue from my changes. That extra weight forward seems to help stabilize the trailer so it bucks front to back less. It is stock 1670 pounds, but add ten gallons of water, the truck box, skid plates, generator, second battery and we’re probably just shy of 2000 pounds, not including my clothes, cooking stuff, food, and other gear. Well shy of the 3500 pound rating of the rubber torsion box axle, and a third or half less than slightly larger trailers I looked at. It didn’t take long to get the electric brakes dialed in, and you can definitely tell when they aren’t engaging. One day I was in too much of a hurry and didn’t do my final walk around, and drove across the campground without the electrical plugged in. I recognized this because I could sense the difference in stopping even at five miles per hour.
Seeing the curved front edge you might think that it doesn’t catch much wind. Well it doesn’t catch as much as a flat front would, but it is still like driving with a parachute behind you. I had serious head winds in a lot of places for hundreds of miles and it meant lower top speeds and worse fuel economy. But this is the price you pay for being able to stand up without any sort of set up (popping up). Now, on a really long driving trip I think that you might want to choose the pop up for less wind resistance. But the day that I left my wallet in the trailer and needed to get it while in line for a toll booth, I was glad that I didn’t have to set it up on the shoulder to get money for the toll. That said, at 45 miles per hour, or faster with a tail wind, the effect wasn’t so noticeable. So if you aren’t in a hurry, you are set.
The Jeep was a pretty good tow vehicle, the 5.7 Hemi has plenty of power for most scenarios. But I didn’t push it too hard on days when there were strong head winds, or steep grades. Most of the places I decided to drive slower than the speed limit there were trucks doing the same speed or much slower. So in an 80 zone I might drive 70 instead, or more like 60-65 with a 20 mile per hour head wind. The motor has a variable displacement feature, that turns off half the cylinders when the load is light. Without a load this activates on the flat quite a bit of the time and almost all the time going downhill. With the trailer, this didn’t happen as much, and if the tow/haul mode is activated it was locked out. So there were times when I was switching into tow/haul to go up a short hill, and out at the top to coast down. Mileage really depended on external factors like terrain, wind and road surface. Average overall on the trip was something close to 13 mpg (which does include a few non-towing days). But I saw days when it was 9.
I like technology and that requires electrical power, plus I use a CPAP to sleep, so I already had some experience with bring power into the woods. I have a lithium polymer battery and flexible 62 watt panel I use for boating and hiking. From that experience I knew that you only charge your battery during the best part of a sunny day when you are planning to spend time around camp. You aren’t going to leave an expensive panel just laying around, and you need to keep turning it to point at the sun. I knew I would be driving during most of these days, and away exploring when the trailer was parked. Having panels on the roof means they will never be as efficient, but they are always deployed, and I don’t have to worry about locking them down against theft. During the long summer days in Alaska, the batteries never got much of a discharge because the panels were constantly feeding them. Of course they are less useful in the depth of winter or in the deep forest. If will be driving a lot, and you don’t end up doing solar, remember that the car’s alternator also charges the system some. I had Apache Camping in Everett install the solar panels and a second battery before I picked it up from them.
I wanted a second battery for power storage, and at first we just mounted this on the tongue in a plastic battery box. But then I decided I wanted to carry a small generator too. This is when I decided to add the diamond plate truck box and put all this stuff inside. We had hoped to install the generator such that it could run in the box, but things were just too tight in the box with its beveled edges. In the end, I only ran the generator once as a test. I never needed it otherwise because I didn’t do the extended dry camping I was expecting. It contains both batteries, the propane tank and regulator, plus the generator. This plus electrical cables, water hose, and some assorted tools. I wanted gas cans to go in the box but there wasn’t space.
I was planning to take my trailer on gravel roads, and as such wanted to avoid damaging the underside with rocks that might kick up. So I had a couple of skid plates built and installed. I don’t know how much this helped or didn’t, but there are a few scars on the front plate. From the mud I washed off the front of the trailer I’m pretty sure that this saved me from some messy cleaning up underneath as well. But that quarter inch diamond plate is almost like another floor, as it covers better than half of the bottom of the trailer. So likely more than 50 pounds of added weight for this peace of mind.
I also had the axle lowered on the frame, which means the frame and trailer are a couple inches higher off the ground. This definitely kept the spare from scraping on the ground when getting on and off of small ferries and in step driveways. The low point ended up being the bottom of the hitch and I think I should have installed air shocks on the Jeep to have fixed this. Being raised up it helped the trailer look more at home behind the Jeep. I had the folks at Truck Trails in Everett do the under trailer work and box install.
That’s the general stuff, now I should talk about each of the systems in the trailer.
- Entry Step – There is a single metal step that pulls out. It feels a little flimsy to someone that is a little heavy, but held up just fine. It worked pretty well in all sorts of weather. Its only natural enemies were mud and ice tossed up from the road. It didn’t happen often, but when something would accumulate in it the step would slide easily out enough, but wouldn’t seat properly. It remained tilted up at a bit of an angle due to the accumulated sand, mud, ice or whatever. Typically a little jangling of the step would fix it, with the ice that didn’t work, so I would stand on the step a couple of times and then rattle it around. I only found one or two places where a small stool might have been useful after the trailer was jacked up to be level. Usually you wouldn’t choose that spot though.
- Entry Door – I find the door to be quite natural and the whimsy of the rounded top fits the trailer. It isn’t hard to navigate even though it is short. The door opens with the hinge forward, that is to your right as you enter, on the left is a solid handle to steady yourself. The latch is a wide recessed lever and has two locks that use the same key. One lock stops the lever from being pulled, and the other is a dead bolt. Oddly, the locks turn opposite of one another. It takes a while to get used turning one left and the other right, or vice versa. The door is shorter than most people would be but you are stepping up or down as you pass through, so it feels pretty natural and not cramped. There is a flat handle on the inside to operate the latch, and a small lever to operate the dead bolt. The door takes some effort to close as it has pretty stiff weather stripping, but keeping the weather out is a good thing and it does well.
- Screens – One really sweet feature on the door and the three opening windows is a sliding bug screen. On the door it pulls out of the hinge side jam and follows a track to the left. It has an accordion shape and does a pretty good job keeping bugs out. Only issue I had was with the really small bugs in a few places. But here I was mostly using the air conditioning and keeping the windows closed anyhow. But you have to open windows to cook inside.
- Counters – In the Q model, the counter extends across the front of the trailer and along the driver’s side about as same as the door on the passenger side in an L shape. The sink and stove are both set into holes in the counter and sit on top of the surface. There is a metal band around the counter’s edge that sticks up just a little bit, the surface is a grey slightly textured laminate. This same band and counter top are on the standard table. The band extends above the surface just enough that it will keep a piece of paper or a coin from sliding off, at the same time it will prevent you from brushing crumbs off too. It is also the sort of thing that would uncomfortably press into your arm if you leaned on it. But your mother taught you not to rest your arms on the table, right? I am also a bit skeptical that this will age well, but looks fine with the light usage it has received so far.
- Benches – The seating area is a cozy U shape. Two benches over the wheel wells, and a couch that extends the width of the back. There is storage under about half of all this space, while systems occupy the other half. The cushions for the sides of the U shaped area are strapped together (back and seat), these lay flat on the table when lowered and form the bed. These cushions have no hard frame, so the top of these benches each has a wood panel covering the space below. The cushions on the bench have a hard frame, two for the seat and one for the back. The back tips forward to release the latch and allow it to lay all the way flat. Pull it up again and the latch keeps it upright. At each end of the bench there is a cushion shaped to fit the space by the wall and complete the U shape. I left these home as I was sleeping sideways. You’d probably leave them in place if you were using the full bed.
- Under the bench by the door you have storage space under the wooden panel and a small door on the end for easy access. The front wall of this compartment (behind your legs as you sit) also has one of the heating system’s radiators. The radiator is contained in a wooden sub-compartment, there are two slots in the face of the bench to allow air to rise up past and get heated. I expect this is pretty comfy when the bed is down. It makes sitting on this side in the cold weather either nice or not depending whether you need the direct heat. Sit on the other side bench if it is bothersome. The wheel well is under this bench, so the storage is less. But good place for things to which you need quick but infrequent access. I stored tools and such here.
- The same side of the rear bench is a huge storage area that extends to the back of the trailer. I stored a small microwave and my drone (in its suitcase) here along with some camping gear and a few other odds and ends. The other half of the bench has the Alde system and valves for winterizing the water system laid out. You wouldn’t want to store things in here, but there is a partition and some space behind it. You’ll get to this is by reaching over the seat back when it is folded forward, so maybe not for stuff you need often. The stuff I put in here was in a duffle bag to make it easier to haul out and put back.
- Under the other side bench is the electrical systems. The AC/DC power converter and distribution component is here and the front of it has breakers and fuses that you access on the front of the bench. The top of this is held down with a screw or two and not a place you would want to store things. But if you were going to put in a big inverter, this might be the place to mount it. (That one is still on my list)
- Storage – Cabinets – The round shape of the outside of the trailer isn’t too apparent on the inside until you reach into the cabinets on the front and rear walls. There are three larger cabinets above the back of the couch, and three smaller ones above the front counter. The bottom and sides are flat and square, but the back wall curves towards you as it goes up which reduces the usable space. I put clothes in the back cabinets, modifying how I folded/stacked them so they’d fit to fill up the space completely.
- I put odds and ends in the front cabinets, things like rolls of tape or Velcro, batteries, remotes, and some accessories like my WiFi range extender and a small power inverter. The doors on the front cabinets open upward. This is pretty neat when you have both hands free. But when both hands are needed for other things the lid needs a way to stay up. I have considered a couple of options, but haven’t acted on either. One was to make a little wooden prop, maybe on a hinge or some Velcro, the other was to put a temporary adhesive hook on the roof and use something like a rubber band to hold the door up, another thought was a piece of elastic cord across the whole width of the trailer that could be temporarily pulled down under and open door.
- In addition there are three other cabinets under the counters. Under the stove, above the A/C is the most spacious. It also extends back under the deep corner of the counter. Happily there is a lip that keeps things from sliding all the way forward. I keep things organized in four corrugated cardboard boxes so they don’t rattle around. The deep area up front not only has a higher shelf, but some water hoses along the top, so this is where I put things like back stock of paper products and such.
- There is space under the sink, and this is pretty easy to access. I put cleaning supplies here. Below this is another cabinet with reduced depth. It has the rounded wall in reverse because of the reverse curve at the bottom of the front wall, plus a few pipes, this is where I stored my toiletry kit and CPAP. In short, things in a container (CPAP is in a pelican case) that are easy to haul in and out.
- Ceiling Fan – The Fan-tastic fan lived up to the brand name. Clear so that it also acts as a skylight is a pretty good thing unless it is June in Alaska. Can be set to pull or push air, and three speeds. Reasonable sound level for a fan, and moves a lot of air. The removable screen was nice the day that the wind filled it with fall leaves. I might think about devising some kind of a cover if you are sensitive to light when sleeping.
- Windows – Three windows, one on each side save the back. Which is funny, because with a trailer, the side you back into the spot is usually the side with the view. It is also where folks wander by the most when the trailer is hooked up. So when you are eating lunch or resting in a rest area you hear noises outside and can’t look out to satisfy your curiosity. Made me want to have a camera there.
- All three windows are hinged at the top, and are held open by tightening a strut at both sides. They lock closed with four latches. The levers require pushing a button on the face to rotate from the locked position, so they are pretty secure from simple manipulation with something like a coat hanger. There is also a way to lock them slightly open to allow a little air to slip in but remain secure. Great for hot climates when you will be away from the trailer for a while.
- They are double-paned polycarbonate. Be careful when washing them with as they scratch pretty easily. The three windows have blackout shades that pull down from the top and meet the bug screens that pull up from the bottom. This made it easy to sleep in Alaska in June.
- There are two round portals, one in the door and the other on the same spot over the stove on the opposite wall. They have an interesting “shade” on them. Two pieces of plastic can be turned to show a dozen or so open pie wedges or twisted just a bit and block out the view entirely. These are translucent, so if you have the lights on at night people might think (someone asked about it) that you have a glow in the dark clock on your door. In daylight this is another source of light if you are trying to sleep in June in Alaska. (not a problem for me, I can sleep anywhere anytime) You will find yourself putting your face close to the window to see what’s going on outside.
- Clean and Waste Water Storage and Pump – My experience has been that the water is fine for washing dishes, face and hands, but not so great for drinking or cooking. My solution was to carry drinking water in the fridge, which also meant it was nice and cold. I put some effort into flushing the system but didn’t got to heroic efforts. Since the trip I’ve been given advice to put a mild vinegar solution into the system and drive around a bit for it to slosh around then flush it out. I may try this, and bleach at some point, although I have to decide about winterizing right now.
- The clean water tank is small and flat, which means you’ll be pumping air pretty quickly especially if you don’t level the trailer properly. The trailer can be connected to city water. An external inline pressure regulator should be fitted between the hose and the trailer for this. The pump and clean water tank are bypassed in this mode (and less bad taste to the water). When not connected to pressurized water, fill the clean water from a separate opening next to the city water connection. This one is designed to allow water to be poured in if required (for example if you are getting water from a hand pumped well in a big cooking pot). Clean water is stored in an 11 gallon tank, grey water from the sink drain collects in a 19 gallon tank. The pump runs on DC 12v and has a switch on the kitchen wall. The grey water has a standard sewer hose connection on the driver’s side. It has a cap on a short leash, and an easy to reach handle that operates the drain valve.
- Heating/Hot Water System – The trailer uses an Alde 3010 system that provides cabin heat via circulated glycol and radiators. Very little noise compared to fan forced air. The same unit provides hot water. You don’t get a blast of hot air that you can warm your hands in, but rather a more constant radiant heat. There are two places where heat comes out, one along the passenger side bench as mentioned above, and the other along the back wall.
- Heat seems slower on AC, quicker on propane. If you have AC power and need a little extra or quicker heat I suggest a $25 ceramic element heater or something like that. Where the cabin heat is a little slow, the hot water is pretty quick and plenty hot. It is “tankless” hot water, but the heater does have a capacity of 6 gallons or so. Water is introduced to the unit for heating via either the city water or tank system. The first time you fill the clean water, the pump will fill the hot water “tank” from there, so after this you need to add more water.
- It can be set to produce both hot water and cabin heat, or just hot water. The unit can be powered from AC shore power or by Propane, and the manual says you can turn both on if needed, but I learned that later on, so I haven’t tried it. It also uses a little DC power for the control systems and pump but not a lot.
- The manual also says it can provide heat without hot water, but it doesn’t say whether this is automatic or not. So I spent a lot of time worrying I wouldn’t have heat if I ran out of water. I’d like to know from Alde whether I can have heat when I run out of water or not and if so, how does that work?
- Sink and Faucet – The faucet is high enough that you can get even a bucket under it, but it is also set back far enough that you’ll want to keep a sponge or towel nearby to mop up the backsplash. This is especially true if you didn’t take the time to level the trailer well. The sink is plastic, so I’d be careful about scratching it up with pans and utensils. Like a typical kitchen sink It has a metal screen trap. In one orientation it allows water to drain, and turned a bit it drops down and becomes a plug. With the small tank running low on water is a pretty regular occurrence, signaled by interruptions in the flow by bursts of air and spattering water. Time for mopping the counter again. The edge of the sink sits above the counter and is caulked around the edge. So you won’t be wiping water or other stuff off the counter directly into the sink. It came with a wooden cutting board beveled to fit in like a cover, but it stayed in the cupboard the entire trip because I didn’t want it warping in the moisture or bouncing around when I hit a big bump in the road. If I was cooking more I probably would have pulled it out.
- Propane and CO Sensors – There is a Propane and Carbon Monoxide sensor unit wired into the system’s power and mounted on the face of the drivers side bench. I had two situations where this sensor turned off the power to the trailer. Both times were in parking lots where there were a lot of diesel trucks idling. One at a truck stop and the other in a Walmart parking lot when we all got stuck behind a landslide that shut down I-5 for a day or two. In both cases I didn’t notice until a few hours later when I was down the road a bit and went to check on the fridge and found it wasn’t running. It was easy enough to reset the system.
- AC Power – The unit has several AC outlets inside and two outside, these distribute an external source of AC power to helpful places around the trailer. Three outlets inside, one on the face of the driver’s side bench, one on the wall at each end of the counter top. Two weatherized outlets outside on the passenger side. I used these to plug in appliances and chargers, and I suspect you’d use the outside ones for outdoor lighting and cooking. When on AC power the converter will automatically charge the batteries. It typically runs a cooling fan when it is doing this, even if the temperature is really low. I had one night where the outdoor temperature was below freezing (about 10 degrees F) and the interior was getting down around 50 F, and the fan was running right on my feet. Well a pillow took care of that.
- DC Power – The unit has a DC charging station on the driver’s side wall above the counter. It consists of a 12v car socket and two 2.1 amp USB plugs. Great for charging all the high current need electronics of the day without their little transformers or any device you might use in a car. This is where I plugged in my CPAP when on battery power.
- Lighting – Pretty good lighting and most of it is low power LED. There are two large easy to find switches above the window just inside the door that switch the ceiling and porch lights. Easy to reach from the step that is, and you have to know where they are in advance. Above the sink is a tube light that has two brightness settings that turns on with a push button. On the back wall in the corners are two LED lights that can be swiveled to reflect off the wall or ceiling, or directed down over your shoulder for something like reading.
- Entertainment System – The sound system and 19 inch LED TV run off 12V DC. The speakers in the back are used for music, but the sound for DVD’s and Television come through the TV only. The unit can play MP3’s from a USB source and connect to a Bluetooth device. it has a DVD player for movies, but not Blu-ray. I used the TV as a second monitor for my computer, and so streaming video. There is an antenna connector near the water inlet on the front of the driver’s side for cable or other video sources. I hooked this up where it was available but if reduced to watching 50% repetitive commercials I chose to read a book. The TV has a bright blue LED to tell you it is ready to be turned on, can be a little bright at night. The mount for the TV swivels out from the wall so it is comfortable to view from any seat in the house. It has a latch to keep it against the wall and there is a further elastic cord with hooks to keep it from wiggling or vibrating in transit. The sound unit has the time displayed, but this is on screen whose contrast is pretty light, so not very readable unless you are right in front of it (for me).
- Propane Stove and Smoke Detector – The stove is on the surface of the counter that extends rearward opposite the door. It has two burners and a glass cover that is hinged at the back. I found that any kind of cooking other than boiling water would eventually trip the smoke detector. I also found that the detector’s “silence” button cancels the alert, but doesn’t cancel detection for any period of time. So a simple omelet required one hand for cooking and one to keep cancelling the alarm. This with a window wide open and the roof fan running at full speed. So I took to removing the battery each time I cooked. The stove requires a source of ignition, so you need a match, sparker or lighter handy.
- Refrigerator – The Norcold refrigerator will run off of propane, AC or DC. I found that it lasted a very long time on Propane, but really sucks the 12V amperage. AC is preferable. I found that it will freeze things solid if you set it too low. Makes a little bit of a high pitched whine when on Propane. Really only noticeable when it is very quiet. There is a bright green LED on Propane mode that you might want to cover up at night. A small pizza box just barely fits in the fridge with some Tetris like skills. Otherwise I can attest that there is room for a dozen eggs some lunch meat, condiments, a loaf of bread and about five or six one liter bottles of water plus six or so cans of soda water. Packing it so that things don’t move around during travel is an art.
- Air Conditioning – The Friedrich air conditioner is great at cooling the trailer and does so quickly. The weather stripping around the top of the unit isn’t really doing the trick and keeps coming out, so I have a note on my to do list to fix this. Only really noticeable in the winter when the A/C isn’t in use, the cold air wafts in and pools on the floor.
- Floors – The laminate wood flooring is pretty, but I put down rugs to protect it from all the stuff that I track in. When it was hot out, the floor got a little crackly when I walked around.
- Leveling and Stabilizers – Front to rear leveling is simple using the front jack. Side to side is often done with cheap plastic blocks that you drive up on. Traveling alone I didn’t have anyone to tell me when I was on the block so I jumped at this other option. It is a big steel cradle for the tire on the lower side of the trailer that jacks it up until the unit is level side to side. Then you level front to back. Only issue is that it is big and heavy, and it’s going to get dirty. So I only used it in extreme situations. There are four stabilizers, one on each corner of the trailer. When deployed the trailer is rock solid. You can correct the level just a bit with these, but not a lot. I cut of the handle from a hand crank and chucked it up in a cordless drill to make the process of “landing” a lot faster.
- Back up Camera – I specifically added a head unit to my Jeep that could display a video signal from the back of the trailer. This was no end of useful.
http://www.tab-rv.com/literature